Situation – You want to integrate Azure Active Directory with EMP Cloud to sync your user base.
Solution – Following the steps outlined below will allow you to configure and integrate Azure Active Directory:
- Creating the custom Application in Azure.
- Configuring Azure within EMP Cloud interface.
Azure Active Directory Sync
Please note:
- These steps have been updated based on the current version of Azure.
- The account creating the credentials must be a Global Administrator.
- Keep in mind the Legacy API at the bottom of the New Registration page also works.
Customers hosted on Office 365 may prefer to use Azure Active Directory to sync users and groups. This will allow you to import:
- Active users (including both primary email address and user aliases)
- Distribution Groups
- Security groups
EMP Cloud only allows connection to one AD at a time. Multiple sources cannot be managed at this time.
Step 1: Creating The Custom Application In Azure
- Login to your Microsoft Azure portal as an admin user through https://aad.portal.azure.com
- Navigate to Azure Active Directory > App Registrations > + New Registration>
- Enter a name for the application (i.e. EMP Cloud Azure Sync).
- Under Supported account types leave the default of Accounts in this organizational directory only (COMPANY NAME).
- Under the Redirect URI (optional)
- Leave the default of Web.
- Enter the appropriate EMP Cloud interface URL into the Sign-on url field (i.e. https://empcloud.cloud-protect.net). Contact Support if unsure.
- Click Register.You will now be able to view this app from the App Registrations view.
- Copy your Application ID for future use. This will be the Application ID in EMP Cloud.
Permissions
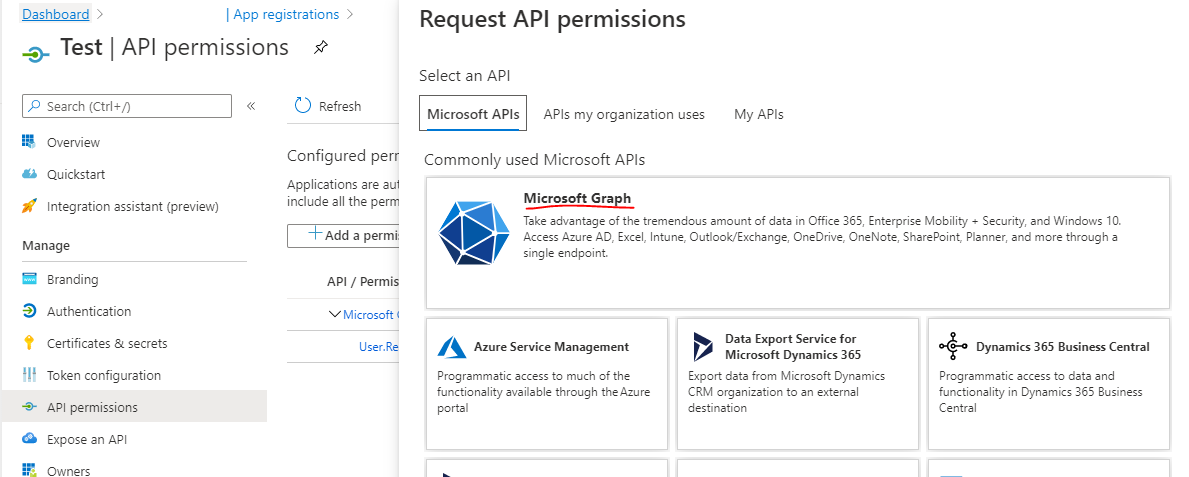
Azure Active Directory Graph under Supported Legacy APIs can work with existing setups. For new setups, or if your old setup is on the Azure AD Graph, you should use the Microsoft Graph API. This is the Microsoft Graph API at the top of the page. If your credentials stop working, or you get the error, “Failed to connect. Please check your Azure Credential” it could be you are pointed to the older legacy API (Azure Active Directory Graph). In this case you will need to setup the Microsoft API Graph.
Additionally, If you get the credentials error- “We have come across a problem, and cannot continue. Please contact support quoting ‘code displayed here’ if this problem persists.” Please create a new Azure App on the Azure admin area and then add the credentials into the portal under “Administration- User Management – Import & Sync – Azure Directory Sync. Once entered click Save. Sync can then be run without error.
End of life for the Azure Active Directory Graph is June 30th, 2022. Click here for more details.
- In the Application ID just created, click on API Permissions > Add a permission > Microsoft API Graph.
- Ensure the following permissions are checked:You will want to click Add Permissions once more and choose Application Permissions.
- Delegated Permissions:
- Directory
- Directory.Read.All
- Group
- Group.Read.All
- User
- User.ReadBasic.All
- Directory
- Application Permissions:
- Directory
- Directory.Read.All
- Directory
- Delegated Permissions:
- Select Add Permissions (at the bottom).
- Select Grant Admin Consent for <Company Name>.
- Select Yes at the top.
Key (Secret)
- Navigate to Certificates and Secrets > + New Client Secret.
- Enter a Key Description.
- Choose a duration.
- Click Add.

The Secret ID will be displayed when you save the changes. Copy down the VALUE Field, as you will NOT be able to retrieve it after leaving the page.
This Key WILL EXPIRE at the end of the selected duration period. After that period of time A NEW SECRET KEY needs to be generated again.
In Azure AD- sign in must be enabled for accounts to be active and mail to flow.
Step 2: Configuring Azure Within EMP Cloud Interface
After logging into your interface:
- Navigate to Administration > User Management > Import & Sync > Azure Active Directory.
- Set the Default New User Role to either End User or Silent User:
– End Users Can login to the Console and receive Quarantine Digests.
– Silent Users Do not have access to the Admin console, nor do they receive Quarantine Digests by default, but can enabled. - Enter the below information:
– Primary Domain – The Primary Domain associated with your Office 365 organization custom Azure web application.
– Client ID – The unique identifier which is generated with the creation of the web application.
– Secret ID – The secret value which is generated with the creation of the secret key. - Choose What to Sync by checking/unchecking the following fields:
- Active Users
- Distribution Groups
- Security Groups
- Choose How to Sync by checking/unchecking the following fields:
– Add Users – Creates new user accounts for newly synced active users.
– Update Users – Updates existing user accounts for previously synced mailboxes.
– Add Groups – Creates new groups/functional accounts for newly synced groups.
– Update Groups – Updates existing groups for previously synced groups.
– Remove Deleted – Users Removes user accounts for mailboxes that no longer exist.
– Remove Deleted Groups – Removes groups/functional accounts for groups that no longer exist. - Choose When to Sync by selecting from the options under the Sync Frequency dropdown menu.
- 1 hour
- 3 hours
- 6 hours
- 12 hours
- 24 hours
If there is no Tech Contact defined in your EMP Cloud Dashboard (Administration- Account Management- Profile-Tech Contact) eventually the system will change the Azure Active Sync Frequency back to the Never setting automatically.
There will be a report that is sent daily called the Azure AD Summary report that cannot be disabled. This is due to notify that the service is running and is a system audit. The only way to stop these is to set the frequency of the sync to never.
7. Click Save at the bottom of the page. The page will refresh and a prompt will confirm that the settings have been saved.
Press Save Button
Do not press the Search Now immediately. Ensure that all your settings are saved first and save it. After it has saved, proceed with the Manual Sync below.
Manual Sync
- Proxy Address
Accounts with no proxyAddresses assigned will not be detected by the EMP Cloud Azure pull. If you do not find the email in the EMP Cloud side, please check Azure to ensure at least 1 proxyAddress has been assigned.
Once you complete the above steps, EMP Cloud will connect and sync data from your Office 365 environment based on the frequency you chose. You may want to execute a manual sync to validate the data being returned.
To perform an ad-hoc/manual Azure Active Directory sync:
- Navigate to Administration > User Management > Import & Sync > Azure Active Directory.
- Choose What to Sync(same as above).
- Choose How to Sync(same as above).
- Click Search Now.
The results of the sync will be organized into categories. You should review the results and uncheck any changes you do not want to take effect.
The automatic sync does not allow manual intervention to take place. Make sure the preferences defined on the Azure Active Directory page are accurate.
- Click Sync Active Directory.
If you try to manually sync and encounter an error, check out our article Azure AD Permissions Error.
How To Log In With A Microsoft Account
Prerequisites:
- You must have user with valid email Microsoft credentials.
- A matching email/alias account in the EMP Cloud interface.
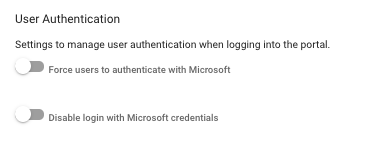
- Enable Microsoft account login, ensure Disable login with Microsoft credentials is disabled under Administration > User Management > Import & Sync > Azure Active Directory
Logging In With Microsoft 365
- Go to your EMP Cloud account login page.
- Enter your Username (email address) and click Login.
- You will be redirected to a Microsoft account login page.
- Enter your Microsoft credentials.
- If successful, login will redirect you back to EMP Cloud and you will be automatically signed into your account.
Enabling this feature will direct all users (including administrators) to login using their Microsoft account. If Microsoft is unavailable, users will be redirect to the EMP Cloud account login page and asked to login with their EMP Cloud credentials.
If there is a problem with the Microsoft SSO, a custom parameter can be passed to utilize standard authorization.
Manual Login With Microsoft Account
We will continue to allow users to manually authenticate using their Microsoft account.
- Go to your EMP Cloud account login page.
- Enter your Username (email address) and click Login.
- Click Sign in with Microsoft.
- You will be redirect to a Microsoft account login page.
- Enter your Microsoft credentials.
- If successful, login will redirect you back to EMP Cloud and you will be automatically signed into your account.