Office 365 provides a remote journaling functionality to send a copy of all mail sent or received by members of a defined security group to a remote SMTP address. EMP Cloud provides you with the SMTP address to use for this configuration.
Solution
- Setup on Email Archive Service
- Configuring an Outbound Connector on Office 365
- Configuring a Journal Rule on Office 365
- Confirm Data is being Archived successfully
Archive Configuration
- From the Admin User Interface, click Archive.
- Select Launch Email Archive.

- Click the Cog icon and select Settings.
- Click the plus sign to create a new connection.
- Provide an appropriate description for the connection and set the Connection Type to SMTP (Office 365).
- Enter the appropriate address in the Undeliverable Journal Address field.
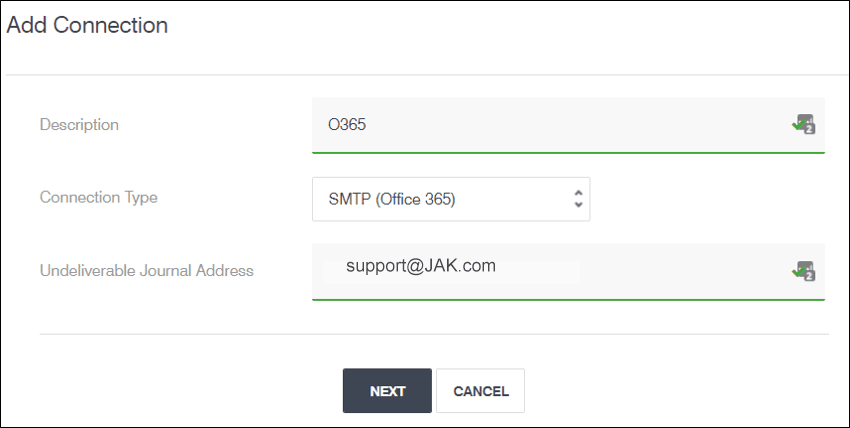
Note: This must match the email address entered in Step 5 of the section Configuring a Journal Rule on Office 365. If these do not match, Remote Journaling will not function. This email address will not be Journaled and is only used for error reporting.- Click Next.
- Note the SMTP Address provided as it required for the configuration on Office 365. This can be viewed again later by editing the connection.
- Click Done.
Configuring An Outbound Connector On Office 365
- Open the Office 365 Admin Center.
- Click the Admin Centers icon on the left-hand sidebar and choose Exchange.

- In the Exchange Dashboard, under the mail flow heading, click connectors.
- Click the + sign to add a new connector.
- Select Office 365 for the From dropdown menu and Partner Organization for the To menu.
- Click Next.
- Enter a descriptive Name (and optionally, Description) for the connector.
- Tick the checkbox Turn it on to turn on the connector when it is saved. You can also edit the connector and check the box at any time.
- Click Next.
- Select Only when email messages are sent to these domains, then click + and enter the fully qualified domain name of the mail server: *.earchive.cloud will work.
- Click OK to return to the connectors screen.
- Click Next.
- Select Use the MX record associated with the partner’s domain.
- Click Next.
- Leave the default settings for the How should Office 365 connect to your partner organization’s email server? step and click Next.
NOTE: The next screen will ask that you confirm your settings. Review these settings, clicking back should you need to make any corrections. Otherwise, click Next.

- In the Validate this Connector step, click + and enter the following address: verification@us.earchive.cloud
NOTE: The above address must be used for the validation step, otherwise validation will fail.
- When prompted to validate the connection, click Validate and wait for the validation operation to finish.
- Click Save.
Configuring A Journal Rule On Office 365
This step assumes you are enabling journaling for all users.
- From the Exchange Admin dashboard, click Journal Rules under Compliance Management.
- Right above the action icons, where it says Send undeliverable journal reports to:, click Select address, click Browse, and select an admin email account. This account will receive notification of non-deliverable journal reports.
NOTE: This must match the address set in Step 5 of EMP Cloud Archive Configuration above.
- Click the + sign to create a new Journal Rule.
- In the Send journal reports to field, enter the SMTP address of the journaling mailbox (e.g. 5er123acd-5432-123aa0a1-d9348328b71@us.earchive.cloud)
- Enter a descriptive Name for the rule (e.g. Journaling to Archive).
- From the If the message is sent to or received from… list, choose Apply to all messages.
- From the Journal the following messages… list, choose All messages.
- Click Save.
- When prompted to confirm that you want the rule to apply to all messages, click Yes.
Confirm Data Is Being Archived Successfully
To confirm that data is now being archived successfully please make sure to login and search the Archive with a user that has Discovery User access to all Mailboxes.
Set Discovery User Access For User
- Login to the Admin Console as an Organization Admin.
- Click the Archive tab (click Launch Email Archive if Legacy is also configured).
- In the Archive UI, click on the Users icon.
- Search for the desired user and click on the Pencil Icon next to their address to edit their settings.
- Tick the Discovery User checkbox.
- Select the All Mailboxes radio button.
- Click Save.